I would like to try a folding screen on the Red Midge. I saw a single windscreen 'leg' for sale on e-bay, one half of a pair, cast in alloy and intended to hold up one end of an MG folding windscreen. There being only one, the wrong shape and rather expensive, I didn't buy it.
It reminded me of my first attempt at such a device. Some 40 years ago! It worked, was as ugly as sin and rather over-engineered. I think there's a picture at the bottom of Special too. That's a pun not a typo.
I'll have another go, how hard can it be? And I must have learned something in that time. Sadly I find I forget some of it too, and end up wondering how, or even if I did, this or that bit.
The 'leg' device is basically a plate to stand on the dash-top attached to an upright component which is in turn attached to a 1/4 quadrant which takes two bolts, one fixed as a pivot and one that can rotate around it. The two bolts hold one end of the windscreen and allow it to pivot forward.
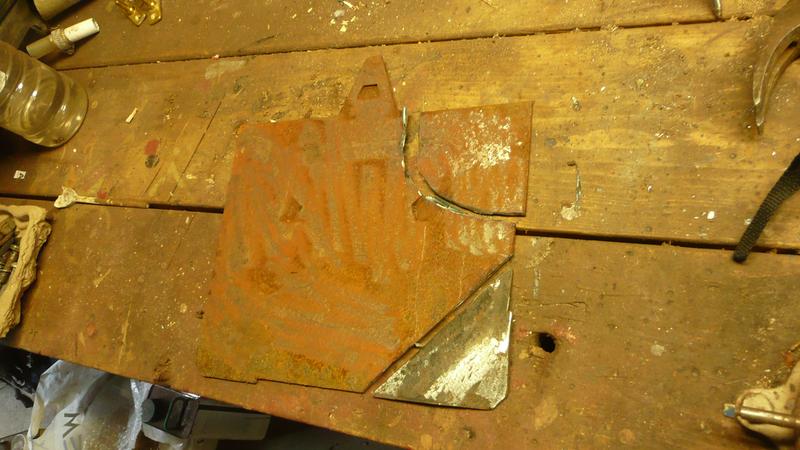
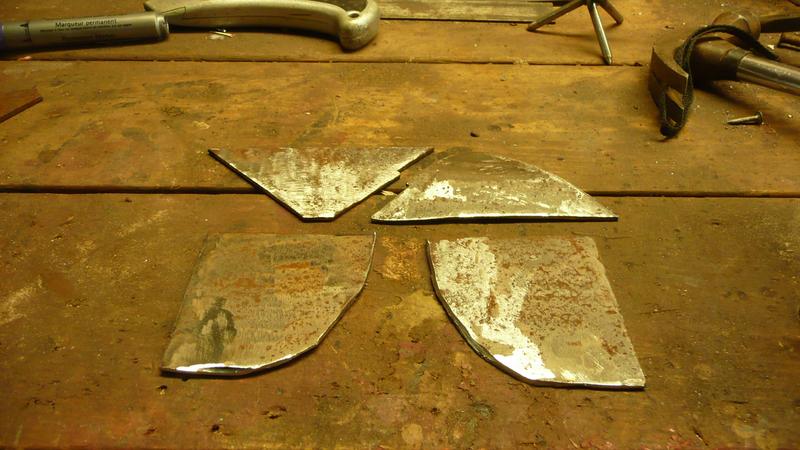
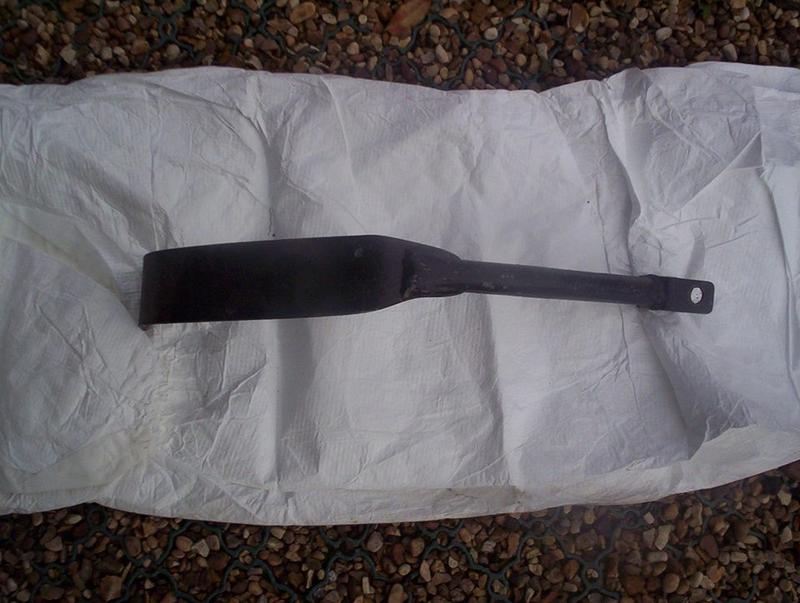
So first a few flat bits, cut from a 3mm plate from inside the old central heating boiler.
Cut roughly into two quadrants and two triangles. I'm working with a fair bit of extra metal here, it's easier to cut a bit more off than add it on.
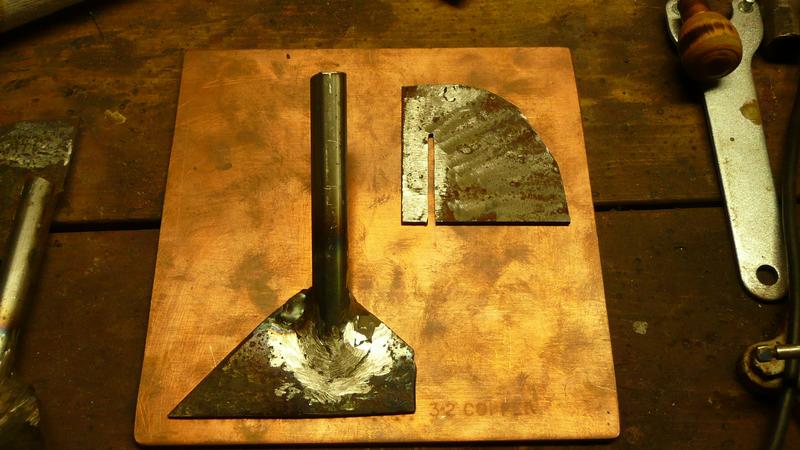
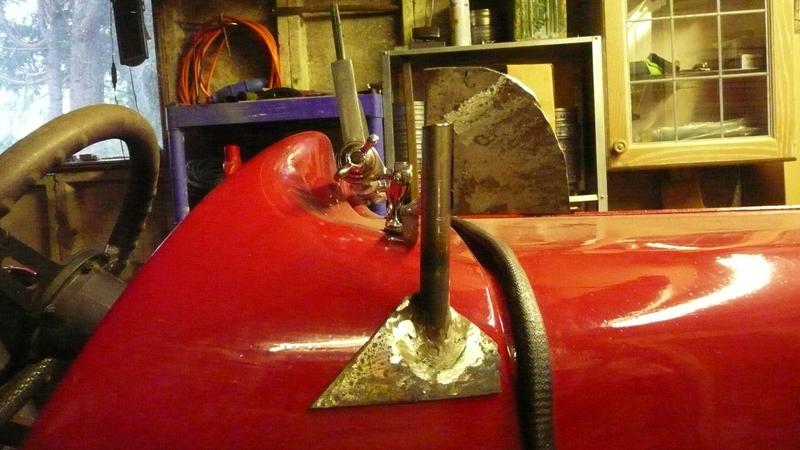
Weld on a couple of bits of 16mm tube and cut a slot in the quadrant. That way you can set the angle of the quadrant parallel to the axis of the car when it is mounted. In the picture below I have a couple of quite powerful magnets on the inner side of the dash top, useful for setting up. If I can work up the enthusiasm I'll make up similar triangles for the inside. If I was feeling really adventurous I might cut the tubes and weld an insert rod into the upper half, that way you can lift the windscreen off when you want to and reduce the structure to a couple of stubs. So I'll leave the tubes a bit long until I have that worked out. It might be a neat mount for the motorcycle mirrors I have in stock
I'll have to work out how to hold the windscreen itself, but the plan so far is to hold the glass in a steel U channel with a 1/2" box section cross-bar welded underneath, like the bottom half of the Brooklands screens. By using steel I can weld corner-webs on to brace it, and add the second bolt which will lock the screen at the correct angle with a butterfly nut. But all that depends on finding the right kind of steel, not to mention a supplier of laminated glass.
Work is ongoing on a cast alloy version that will look much nicer than this. More later.
Meanwhile there's a Tonneau cover to organise.
More news on that front later, and the side screens for the Green one, ditto.

Midge Central
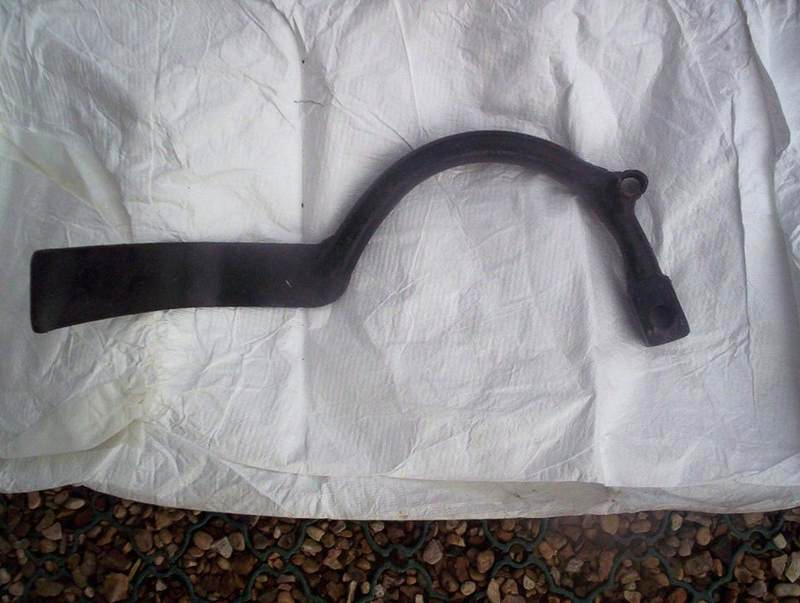
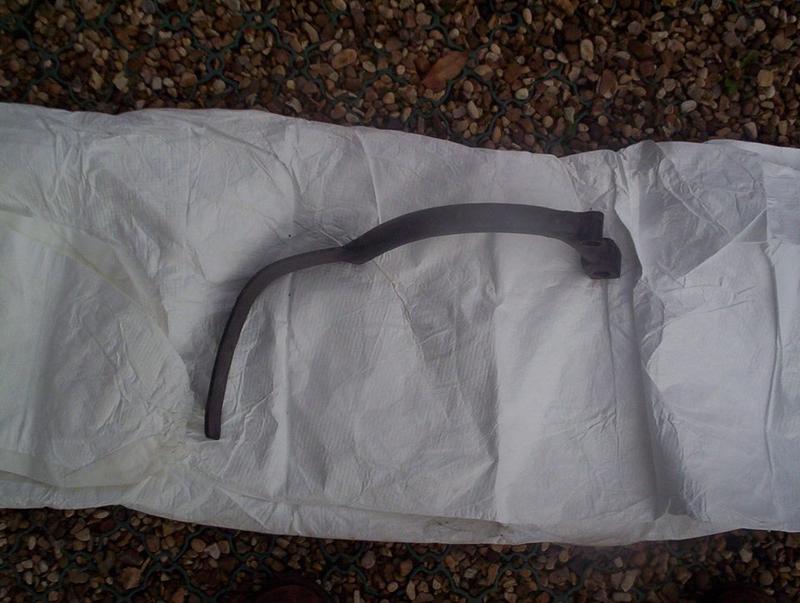
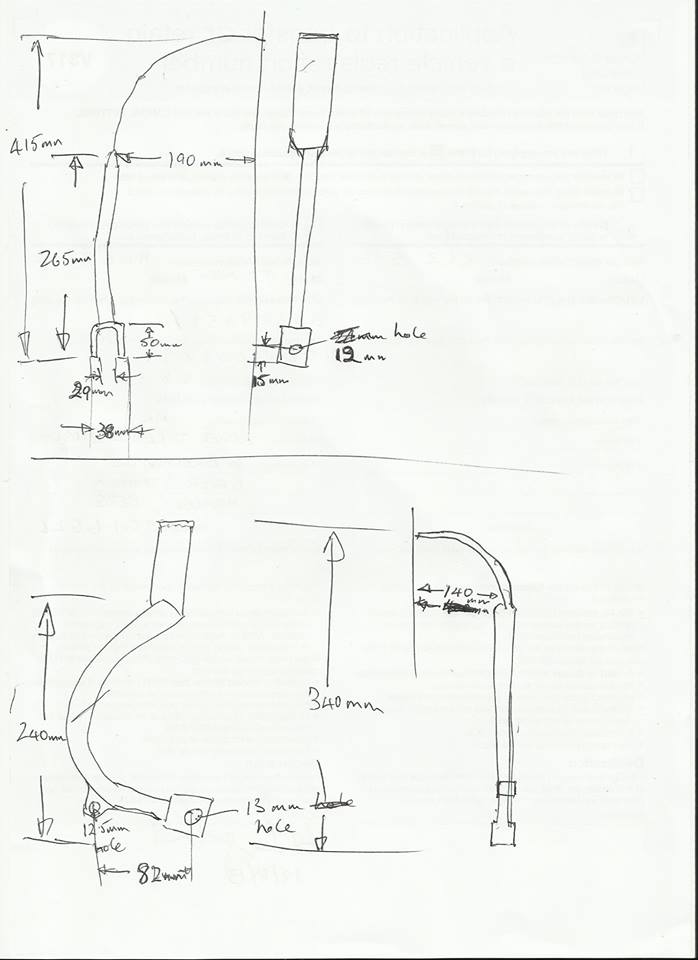
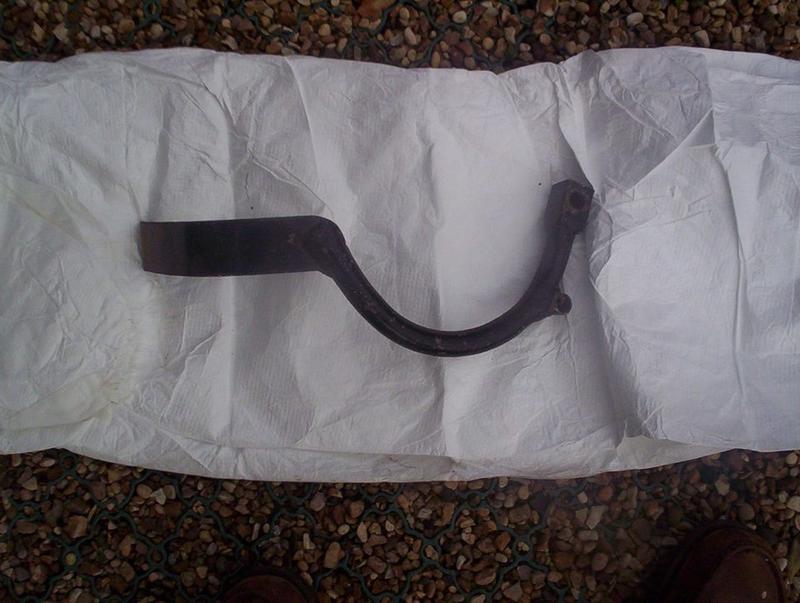
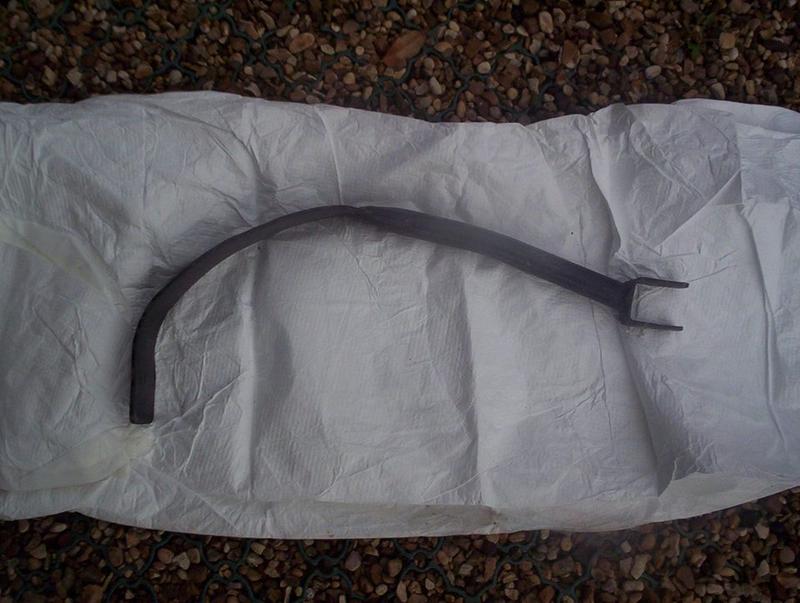
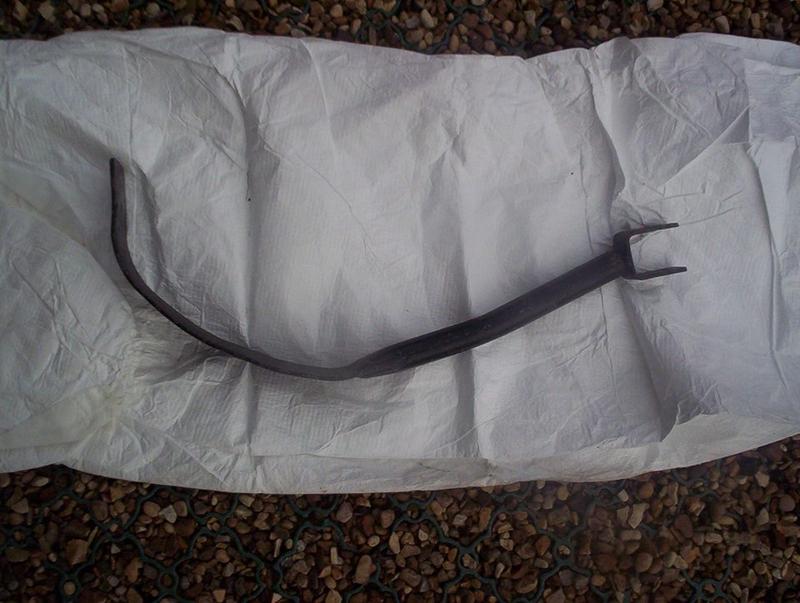
For Triumph Midges Here are pictures of the two brackets for the mudguards to turn with the wheels. The first bracket attaches to the calliper fixings so longer bolts will be required, whilst I assume the second bracket fixes to the suspension turret. Images and words from Roger England.
If anybody has had one snap, tell me where it broke and I'll put up an indicator for reinforcing.
John Cowperthwaite issued this note, below. Be careful out there.
I designed the Midge with fixed front wings because they can be spaced away from the wheels, quite high above the tyres as per the rear wings,to help the illusion of the wheels being taller and thinner than they are. Cycle wings that turn with the wheels in my opinion spoil the appearance of the car by making the bonnet look taller and tractor-like. They have to hug the tyres very closely for two reasons. firstly because they can limit lock and secondly and more importantly,wings mounted on long wing stays can subtly vibrate and cause metal fatigue in the wing stay root. I have had the experience of such a fracture where the front wing came adrift at speed,wrapping around the wheel and locking it! so whatever you do design your wing stays so that they do not vibrate and are substantial enough for the job. Regards to all JC
www.carburetterexchange.co.ukFuel problems in a Midge.
(Apart from the actual cost of petrol)
I’ve been having a conversation with Peter, his Midge won’t start without a lot of cranking if it has been standing for a while. I suspect he and I are not alone in this.
I’ll ignore things like damp spark plugs and stale fuel for now, and concentrate on specific faults that you might find in a Midge.
Properly set up, the Triumph 13/60 twin SU and Stromberg carbs produce few problems unless seriously worn, the 12/50 downdraft has a charming tendency to leak, mainly age related incontinence and over complication. Ford Cross-flows usually have a fairly reliable twin choke Webber, and a return pipe which can complicate matters somewhat.
•Fuel run back
•Air ingress
•Fuel leaks
•Fuel blockages
•Weak fuel pump
•Tank vacuum.
•Older pieces of plastic being dissolved in modern petrol which has ethanol in it.
By the roadside.
For a quick fix you can take the spark plugs out, loosen the fuel cap, and spin the engine more easily while you air dry any flooded plugs. Check for sparks and bubbles. If that doesn’t sort it then disconnect the fuel line at the carb and check the pump action (mind any loose petrol). Delicately clonk the float chamber to free off a stuck float valve.
What do you mean you haven't got a tool kit? What kind of Midge driver doesn't have a basic tool kit? Call the AA. No mobile phone? Achieve Darwin Award, write a letter, and die of exposure. Nitwit.
Back in the work-shop.
Essentially the problem, irrespective of the cause, is usually a low fuel level in the float chamber, If the car has been standing for a while, some of the petrol will have evaporated or leaked and the delay is the refilling, usually compounded by flooding, swearing and flat batteries. The usual and simplest answer is to prime the chambers by manually operating the fuel pump, sadly these, with a manual override lever are thought extinct in the wild now. If you have one, do that then remember that the pump is on a cam, and if the cam happens to be at peak then your pumping it will not help because the spring cannot de-compress. Half a turn of the engine should clear that. If there’s no manual lever on the pump then you can spin the engine with the spark plugs out, but in the longer term I recommend an additional electrical priming pump, which can be fitted in line, ideally near the tank and at fuel level. The sooner it is pumping fuel rather than air the better it will work. The best place for any fuel pump is next to the tank, but that cannot happen with a mechanical unless you put the tank in the engine compartment, which I advise against.
If, as on the Ford carburettor, there is a return pipe to the tank, then you may want to fit a switch to the electric pump so that it doesn’t run the whole time, leave the mechanical in place, and just prime the carb with the electric at start-up.
Electric pumps, (can be skipped if that’s not what you want). I liked the SU type mounted on the Morris1000 and Minis bulkhead, but they were a bit prone to dirty contacts, and occasionally I had to get out and bang it to get it going. On the upside they were noisy, you could tell when they hadn't started up when you turned on the ignition, and, in those impoverished days, when the tank was getting dry you'd hear the rattle of drawn air and you could wiggle the back end of the car to throw the fuel around a bit, thereby getting to the garage. That kind is rare now, though you can get new, if expensive, ones. More modern styled ones don’t have the dirty points problem (or the small spark they are prone to). Mine is relay operated which takes the loading off the switch, old style switches were heavy enough not to care.
Diaphragm pumps To the best of my knowledge, electric or mechanical pumps all use sprung diaphragms to actually pump the fuel, and so the thump you hear is the diaphragm and spring being compressed, drawing fuel up. Pumping fuel to the carb is done by the spring, and it will not pump again until the spring has decompressed. That is why the diaphragm and a sound spring are the most important bits. Proper pumps have a 2½" minimum diameter, 3" is better. Smaller means less petrol pumped per stroke and more noise.
If the pump is working then the next area of interest is air being sucked into the pipe between the pump and the tank, that point might also leak fuel out when standing. Check your joints and clips, especially where the pipes change diameter. The internal diameter of the pipe is relevant in that a large pipe has greater capacity and will take longer to fill if it has ‘run back’.
If there is a leak between pump and float chamber, being under positive pressure, it will leak fuel out (instead of sucking air in) and so be more obvious but more dangerous.
Additional non-return valves, vibration absorbing flexi-tube and filters can all help (unless they leak) but all add joints to the system, and resistance to fuel flow. A healthy pump should be able to push past them but remember that there are three valves and a filter to push past before you add anything.
I was rather surprised to find that my Triumph Midge didn’t have a tank vent, which explained why it wouldn’t start if I did a long run and then parked for more than a few minutes. The vacuum in the tank sucked the fuel back, so that the pipe was full of air. I hadn’t helped by tightening up the filler neck joint. The cure was to put a vented cap on the tank. A very small hole will do, but remember not to smoke when standing next to an upside down car, especially if it has crashed, as that loosens the joints.
A tank vacuum is not going to siphon the fuel out of the float chamber as there is an air vent in it, above the float level, but a leak will empty it. Look for dark stains around the base, a clean carburettor is easier to check. The 12/50 Solex is the worst for that as they are the oldest, most worn, and overly complicated. New ones are available at www.carburetterexchange.co.uk
The float valve can stick of course, blocking the input, or over-filling, and the manuals always suggest perforated floats as a likely cause. All are possible, but rare. Assuming you would have noticed the smell of a petrol leak, the problem is usually worn non return valves allowing back flow, weak pump action, or air being drawn in by the vacuum. (check, if your filter is transparent, for bubbles).
Diaphragm pump. Bigger diameter = bigger volume = faster flow.
Fuel pipe. Bigger diameter = bigger volume = slower fill rate.
Non-return valves. Two in any pump, become inefficient when contaminated or worn.
Fuel cap. Vented or non-vented. Does it hiss if you release it after a long run?
Filter. Near the tank protects more components, especially if you swing the tail as described above, but is harder to check or change
Pump. Nearest the tank is best, but more likely to leak petrol than draw air.
Electric pump. Can be mounted near the tank
Mechanical pump. Quieter and designed in. Non return valves may fail with age or dirt. Only works when the engine is turning.
Return pipe. Reduces the effect of stale petrol and flushes bubbles out faster, but complicates electric fuel pumps.
Down-draft carbs. Fit inside the bonnet easier, more complex.
Best route. Tank to filter to electric pump to non return valve to long thin pipe then Mechanical pump if fitted and eventually Carburettor. Some prefer to put the filter after the electric pump.
Petrol. Modern petrol has chemicals that will dissolve some plastics
Siphoning. If the fuel line is below the fuel level then it will draw fuel more easily, but it can drain your tank if it leaks, and will still siphon it if the leak is below the fuel level irrespective of what height the pipe reaches in between.
I prefer plastic, if it is tolerant of modern petrol, all the way from the tank to the filter just before the electric fuel pump, high on the bulkhead. But the pump does have to be quite powerful, and it is an old fashioned way of doing it. Don't start the engine until the pump has settled down unless you want to pre-load the oil pressure.
Best route. Tank to filter to electric pump to non return valve to long thin pipe then Mechanical pump if fitted and eventually pipe to Carburettor. Some prefer to put the filter after the electric pump.
Simplified version. Plastic pipe, about 4mm (3/16) internal, all the way from the tank to the new SU electric fuel pump, high on the bulkhead. Same pipe to the carburettor avoiding the exhaust and other hot bits. Metal braided rubberised pipe with stainless high quality jubilee clips for connections. The old fashioned and simple way of doing it, but with no extra filters, in spite of the vulnerability to dirty fuel.
Does mine look like that? No chance. The above is how to do it properly…..One day…..
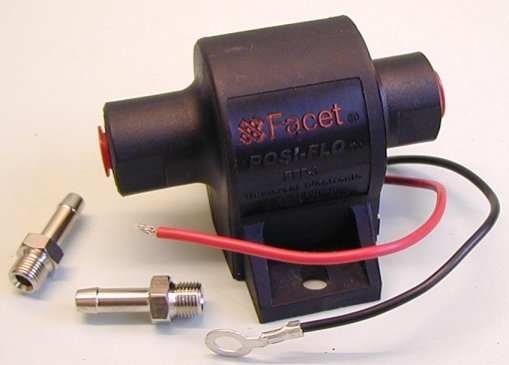
The Classic SU.
£100.Authentic
though expensive. Unreliable when old (who isn't?) but a good big diaphragm for pulling fuel uphill Not Chinese!!
Cheaper alternative, no points to
corrode. Exterior grade.
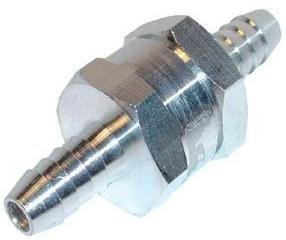
One way valve, can also be used
to vent the tank safely.
Lets air in, stops fuel
getting out.
http://www.carburetterexchange.co.uk/[email protected] problem Analysis sequence
1. Enough fuel in tank? No? jump to 9.
2. After your next convenient run of several miles, ideally with a full tank, release the fuel cap. Any hiss indicating a partial vacuum? Yes? jump to 10
3. Loosen tank cap to guarantee no vacuum, Disconnect fuel line to carb, put the end of the line in a jar and manually operate fuel pump. How long does it take to start producing fuel? More than five or six is indicative of run-back. 5/6+? jump to 11 but come back to 4 later.
4. Any staining around the carb base indicating leakage from the float chamber(s)? (3 and 4 could be two separate faults, as runback shouldn't drain the float chambers) check for cracks, sticky needle valve and replace gaskets and seals. Rimmers do some rebuild kits for SU and Stromberg. But not Solex B28 and 30
5. Check your carbs when the engine is running, (I found mine, a Solex was dripping petrol, basically because it was worn out)
6. The small, low fuel tank found in many Midges shouldn't be a particularly difficult place to pump fuel from, but you may want to consider a separate non-return valve near the tank.
7. If none of these solve the problem, consider adding an electric pump.
8. Check all joints and hoseclips. Poor joints between tank and pump tend to let air in when running and fuel out when parked. Poor joints between pump and float chamber tend to leak fuel out when running and air in when parked .
Answers.
9. Fill tank.
10. Release filler cap after runs before turning off engine, fit vent to tank or cap when possible.
11. Run back, could be a leak from the fuel pipe, but that would make the garage smell of petrol, probably tank vacuum, but also an indicator that the non return valves in the pump might have failed. If the tank is well vented then consider a new mechanical pump. That would replace both valves, resolve any stiffening of the diaphragm, and fix any weakening of the spring. Rimmer Bros does one at £20 plus p+p They also do a rebuild kit if you want to retain the original AC type on the same page (I don't see a spring in the picture but I may be misinterpreting)
Re: "releasing cap". This refers to the filler cap on the tank, taking your hat off won't help.
There are lots of other suppliers, so check around, I have given Rimmers as an example. There are also carburettor rebuilding sites such as http://www.carbex.demon.co.uk/
Take a look at http://www.carburetterexchange.co.uk /who sound useful and even have new B30 PSEI. Mick of 'the carburetter shop' has sold his stock and the business is now at (email) [email protected]
"I have still got some new 30PSE1 (£175 inc p+p) which although not meant for the Herald fit and run really well, the main difference is the choke arm which can be changed for the one on the old carb or simply bent to match up the cable. I have some spares for these re diaphragms and needle valves. SU wise I have some SU HS4s and spares."
In the end, replacing carburettors and fuel pumps with new units will solve most problems, There are very few Midge problems that can't be beaten to death with a big bag of money. Rebuilding them is cheaper and more pleasing, but does require a degree of skill and attention to detail. Don't skimp on the Jubilee clips as drawing air is a real pain and use good quality, narrow bore pipe, the bigger the bore, the more petrol has to be pumped to fill it. Watch out for PRC quality control, if it's cheap it may be cr*p. If you think the equipment has been unused for a while it may be worth checking for plastic components that are not ready for petrol with ethanol in it. I had a LandRover that had such an old plastic filter on the end of the petrol pipe in the tank. It disintegrated and blocked the newer petrol filter near the carburettor with little bits of plastic. I found out when the tank ran low and the bits were sucked up.
The amount of ethanol may well increase, it has before, there is a Feb 2014 article on Whatcar.com which is worth a read http://www.whatcar.com/car-news/new-e10-fuel-will-cost-uk-motorists/1229022
Currently in the UK we are being served E5 ie 5% ethanol, E10 will have more effects, but at least the garages will have to mark the pumps accordingly.
Ethanol
I have had the old style petrol pipe, initially transparent, go yellow and brittle. You are unlikely to find any of that nowadays except on 'barn finds'. I have had strimmer and chainsaw fuel pipes 'craze' and fail, and old lawn mowers are vulnerable too. In cars remember the effects are gradual, so just because it is working now it's no guarantee for the future. It might be worth looking at the 'Super Unleaded" versions.
Items that might be affected;
Tank. Plastic and rubberised fuel pipe, flexipipe etc (including vent and filling pipes) and internal filters. Rubberised tank cap seals. Tank 'Sender' floats and gaskets.
Fuel pumps, i.e. their seals, filters, non return valves. Gaskets are sometimes vulnerable and I think SU diaphragm pumps are.
Pipe. plastic and flexi.
In line filters, although these are usually replaced being disposable.
Carburettor Input filters, plastic banjo washers, float valve sleeves, floats, gaskets and butterfly spindle bushes.
Fuel injectors, about which I know little, rare on Midges.
?Old petrol cans?
I would recommend the use of new in-line filters (near the carburettor) even though the extra joints and jubilee clips add to the possible problems, if you have any doubts, but the best is always a metal mesh on the carburettor input pipe
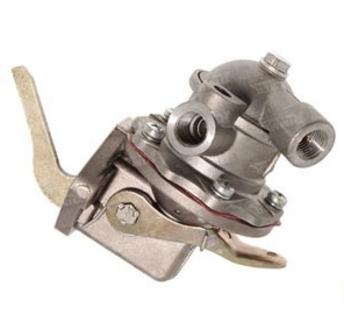
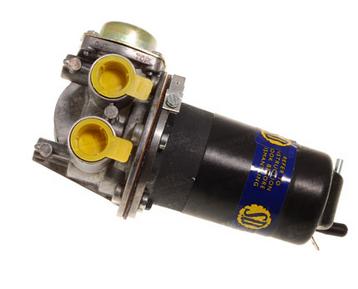
Rimmer's replacement fuel pump, not an AC but 12/50 and 13/60 compatible.
Ignition system faults
with thanks to Ray Jones
Modern components are definitely poor but the KEY to all this is the coil's DC resistance - use an ohmmeter to check between + and - terminals. For a 12v coil it should be NO LESS than 3ohms. A good 12v unit should draw a DC current of about 4A when the points close. Any less resistance allows more current to flow, stressing condenser and points. If the coil measures low resistance it may not be a 12v coil...possibly 9v or 6v designed to use with a ballast resistor. For instance - a 6v coil will measure about 1.5ohms. If you use it on a 12v system it will draw about 8A working the points and condenser very hard indeed! Worse, the HT generated could approach 40-50kv - double the usual - easily capable of arcing internally through the rotor arm to dizzy shaft. If all your ignition parts are working within the intended currents and voltages, you should be OK.BTW, a standard coil HV winding resistance should check out at around 5-8kohms between centre tower connection and either spade terminal. It should also show 'infinite' isolation resistance between HT outlet and casing, or vehicle ground.