It is difficult to get narrow mudguards unless you know someone who can make them, it usually requires an 'english wheel' and there's another special device for rolling the inside edge. Probably the best bet would be to get some standard mudguards from the suppliers of trailer equipment. This is for instance a uk supplier
There are several others.
If you want to make them more narrow, it is possible to cut a strip out down the middle, overlap the edges and weld it back together. I have found it difficult to get narrow tyres and wheels, so I haven't narrowed mine. It is usually worth shortening them, especially if they are not mounted on the hub, because otherwise they touch the tyres when cornering.
Front Mudguards, Front strut
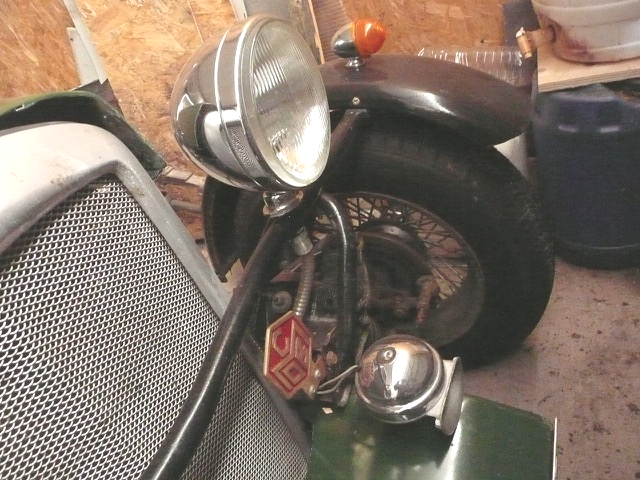
Mine is a transverse tube, with a bend in it to clear the grille, it actually is in three pieces so that the ends, which have simple upturned tabs for a bolt. can be fixed, the middle piece, with the bend, can be joined to them with a short insert tube, and then welded or bolted through. The headlights are mounted through the tube, I flattened it a bit and welded on a couple of large washers on each side. There are more sophisticated methods.
That holds the mudguards up and apart, to support the structure there is a bent tube with flattened ends mounted on the chassis. Like the headlights there is a through bolt, some flattening, and some reinforcing with welded on washers.
Front mudguard rear strut
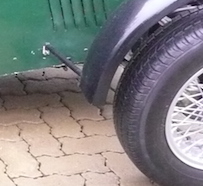
On to the rear bracket of the fixed front mudguard. It is essentially a tube with a tab welded to each end, so that a bolt can be used to hold the medial end to the body. There is either a second bolt on the mudguard end doing the same job through the mudguard, or a curved strap which can be welded or bolted to the inside of the mudguard. Personally I think the strap is over complicated in that it is difficult to make it the right shape, if it is strong enough to be of any use. For this reason I have tended toward a geometric support rather than brute force. Most of the strength comes from my upper support and the rear or lower one just stabilises the back end. Because the mudguard doesn't turn it tends to foul on the wheel on full lock This is particularly common with taller wheels. Shortening the mudguard generally sorts that out. Mud-flaps might help if you don't want the back half of the car splattered, as seen below.
Rear fixed Mudguards
I used to have heavy brackets on the rear mudguards, but as the size of wheel was changed up to 15" I found that moving them was rather tricky, six large bolts through the bodywork, and great ugly bits of metal all over the place. I tried spacing them out from the bodywork with inch box section, but although it worked, it looked even more ugly.
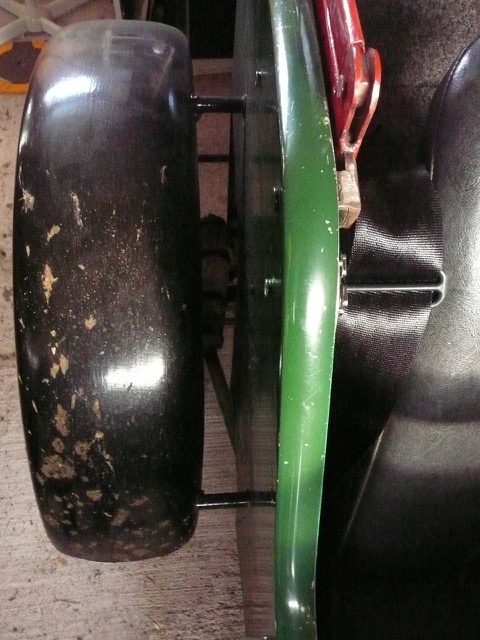
I changed to a lighter method using long bolts through tubes. Essentially there are now 3 tubes holding each mudguard away from the bodywork, with a washer at each end of the tube to protect the body and mudguard. Going through the mudguard, washer, tube, washer and bodywork, in that order, a long bolt pulls them all together until the tube stops it. The three points seem to hold the mudguard in place, and although you couldn't stand on it, it seems secure. I started by welding the tubes to the mudguard, but later found it easier to just cut the tube on a curved oblique. Being lighter in construction and dependent on the geometrics, rust is more of a threat, but as yet, vibration hasn't caused any problems.
As you see, the only visible bits are the tubes, whereas the old brackets were huge, basically a short tube with a large plate at each end, and when I went to 15"wires I found the mudguards needed widening by a couple of inches, and it meant moving those 6 bolts. I decided that a total of 12 1/2" holes in each panel might compromise the structural integrity, so I refilled the 6 holes with dowel, filler and paint and just made 3. The picture of the old mudguard has only 2 brackets showing as I used the third, middle one as a support while working out the various lengths of tube and bolt.
If you try this method the important points are where you put the holes and how long the bits of tube. I fixed the rear one and then adjusted the mudguard to taste by pivoting it. You may prefer to start with the front one. The cars are not parallel sided, so the mudguard will be closer at the front than the back. A piece of taut string will tell you if they are in line with the front mudguard.
Remember to load the car appropriately so that you have clearance when the car, with two people, and a picnic basket go over a sleeping policeman, or indeed any unconscious official. New rear shock absorbers may help if you have any excessive travel, they are usually only good for 30 000 miles. In practice, for Midges they will either be 'quite clean looking actually' or ' a bit knackered.' The latter should be replaced, but watch out for the occasional re-paint, that can disguise all sorts of horror. If they have been repainted, they are probably 'gubbed.'
New bushes and the right bolts would be a good move while you are at it. Your Midge will probably weigh about 4 to 5 hundred kilos A Spitfire was a bit under 800kg. Here's a useful page of specs.
and another more
If you really want to get nice authentic mudguards you'll need a lot of kit, or make friends with a chap like this.
Seeing that makes me want to go back 50 years and re-train as an engineer.
Fixed Mudguards for Midges