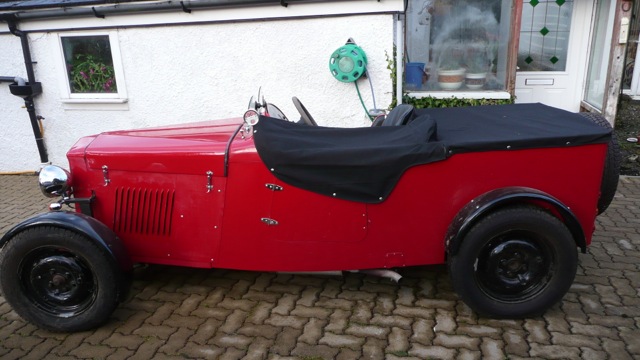
Being an unusual shape the tonneau cover had to be hand made. Bryan Coventry was kind enough to take on this task, and seems to have made a neat job of it. I asked him to make it without 'pockets' for the seats and steering wheel for the simple reason that the fewer the joints the fewer the leaks. (I'm thinking of the years of wear I hope to get from this, there's nothing suspect about Bryan's stitching). Since the seats hold it up and taut, the rain should run off. The fairly small steering wheel is only slightly proud, building in a small amount of slack deals with that, and I'll be putting in a few more pop-studs to tighten out the few wrinkles that you see. I was fitting it on a cold day, so I figured it should be set fairly tight, and let it bed in as it warms up. As yet the only mod I think might help is a small split at the edge behind the drivers seat so that I can fold the side in before I roll the driver's panel back, a small flap under it should prevent any rain ingress when parked. An alternative would be to just roll the panel back and slip on a tailored 'sock.'
Because this is a tailored design, I was able to tie in a few features which I wanted, simplification being one. Another was to leave the pop-studs off till I had it on the car, that way I could adapt as I went along. I have used pop-studs rather than 'lift the dot' or any of the more complex fixings because it will be easier to adjust their positions if needed.
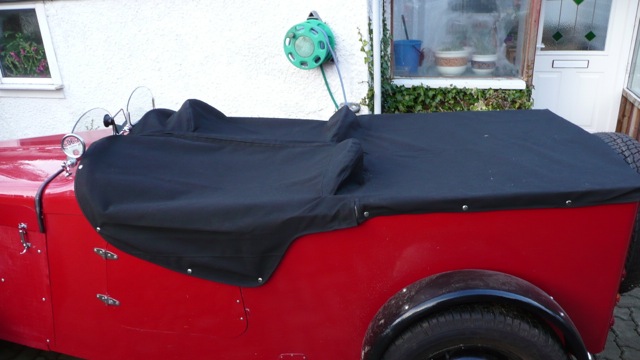
The filler cap for the fuel tank is hidden under the 'parcel shelf' at the back. I might change the position of that completely and put it on the side above the rear wheel, or next to the spare, but there seemed little sense in making a hole before I'd decided where I want it. Anyway the four pop-studs undo quite easily and the cover can be folded forward for now.
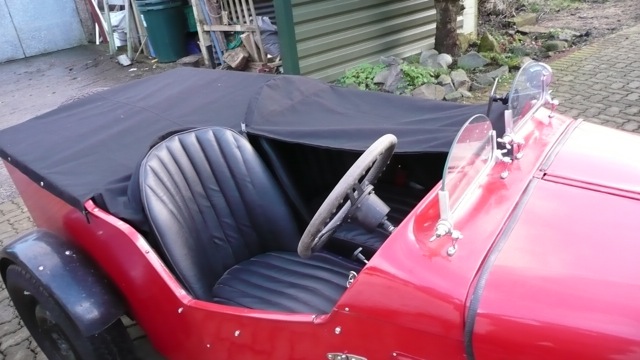
Since writing that, Bryan has put in pockets for seat-tops and steering-wheel, as seen in the pictures above. I'll wait for a warm day (might be quite a wait) before making any final adjustments, Any wrinkles are down to my positioning of the studs.
Bryan normally makes Narrow-Boat covers, which are quite different in shape, but similar in purpose. He has a wide range of colours and materials available. This one is in Black Acrylic which is wonderfully light, and has all the characteristics I wanted, If I get one for the Green Midge it will have to be more complicated as the chairs and wheel are higher, and I might go for a light tan colour. The black matches the chairs and mudguards on the red Midge, but I'm hoping to re-cover the Green one's chairs in brown leather. Another task for later.
Depending on pressure of work and life, Bryan might be persuaded to make Tonneau covers for other Midges, He has one of his own, so he has a standard model to start with. Knowing how Midges vary, it might be a good idea to take a few measurements though. I'll ask him before putting his work-load up, he might just want a bit of a rest, especially as he thought he'd be able to under-cut the competition. Those prices will depend on the type of cloth used and any added complexity like extra zips. He'll need a paper template, basic instructions below-left in How to.
The double curve dash top isn't the easiest shape to put a tonneau cover onto, but a bit of thought seems to get around it and the answer is usually a couple more studs.
A Tonneau cover for the red Midge. January 2014.
HOW TO.
Heavy paper seems to be the best template material, I used traditional brown paper that tailors and the like used before plastic. Otherwise, wall-lining paper, the kind you put under wall-paper to cover cracks and blemishes, would be an alternative. Make up a large sheet, I used parcel tape to join two (1 yard wide) pieces and to add a couple of 'wings' to hang down over the doors. Bryan recommends the use of double sided tape to stick the whole thing down onto the body-work. Cut out slots for the seat-backs and steering wheel and re-tighten. (I suppose it would be best to set it all up with the chairs and steering wheel removed, but I didn't. If you do then the chair and wheel slots won't cause problems when tightening and can be done later ). Bryan will need to know the height of the seats and wheel above the plane of the tonneau cover. You'll need a bit of clearance for the centre zip. Add markers for the split if you want to be able to fold the edge in before rolling the drivers section back. Pictures and rambling commentary on you-tube http://youtu.be/z3FgwQ7PCTA so that I could show Bryan what it looked like.
Once you have it all tightened, the rear corners will need some kind of fold-over, Simply pleat the paper so that it forms a corner, and mark the paper to show the creases.
The depth of the overhang needs to be at least 2 inches all round, and I would recommend a degree of generosity here, it's easier to cut bits off than add later.
Using the brass rubbing technique, mark the edge of the car body onto the paper and follow it round with a line at least 2" wider to show where the edge of the cloth should be. Most Midge bodies are shorter than mine, but I think the rear portion should still have a horizontal edge.
I put my own pop-studs on afterwards, bear in mind the size of the attachments you intend to use. 'Lift the dot' and Turnbuckles need a bit more space. There will be a hem with a covering strip, the fixing should go through the folded over hem but not the covering strip.
My first Tonneau cover is in black acrylic which has the advantage of "black goes with everything" and is light-weight for storage and postage. There are other colours, cloths and weights available. This model has racing screens rather than a windscreen, remember that you have to get your hand in to undo the fixings, a Turn-buckle may help in cramped areas.
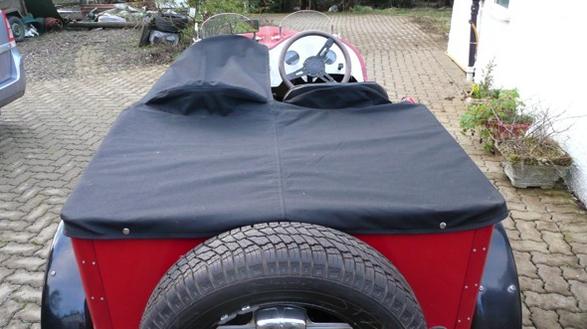
Different areas of the cover have different functions. The driver's flap won't need to deal with high winds the way that the attachment of the front of the zip on the passenger side will, and the flap hanging over the passenger door may have water coming up from the front wheel.
When I have Bryan's approval, proof-reading etc. I'll add any bits he deems suitable, so don't take this as gospel until I've removed this sentence.
There are lots of suppliers of fixings on e-bay and Amazon. Search terms such as press stud, pop stud, lift the dot and turnbuckle may help. Make sure they are stainless steel throughout and make sure you have a robust 'anvil' and former, usually supplied as part of the kit they can be a bit frail. A company called Ossian seems fairly effective though the stamp rod seemed a bit soft. The one by Gunson seemed more robust, but you only get 6 studs, remember that it takes 3 or 4 bits for each stud, so a 7 piece kit might only get you one stud!
Revolving leather punch pliers are useful. I first used a fine drill bit to make a co-ordinated matching hole in the cloth and the body-work, but an awl might be better.